BlenderBS - A Basic Blender Guide
- About This Document
- Shortcuts
- Search Commands
- Vertex, Edge, Face
- Extrude, Inset
- Shrink and Grow
- Slide Along Mesh
- Snap Along Mesh
- Sheer
- All About Bevel
- Delete and Dissolve
- Fill
- Duplicate
- Split
- X-Ray and Z
- Knife
- Loop Cut
- Object Focus and Hiding Other Objects
- Recover Closed Modifier Menu
- Quad View
- Selection Methods
- Proportional Editing
- Pivot Points
- Transform Orientation
- Mesh Modeling General
- Mesh Normals
- Spherize
- Blender Modifiers
- Moving Origin
- All About Rigging
- Weight Painting and Agony
- Lazy IK Details
- Links
About This Document

BlenderBS with SysL
The title will attract people with useful corrections!
I don't honestly think that Blender is bullshit, but sometimes it's painful.
What is This Document For?
This is an ongoing document that I will update as I learn more about Blender and how it works. Mostly for my own reference but it could also be helpful for others. As a bonus, if I say something that's incorrect I'm sure I'll hear from people telling me how to do it correctly.
Oh, this document (text and screenshots, not the website layout) is also under CC-BY-SA 4.0 Int. License.
Is This Going to Teach Me Blender?
Nope! In fact this document assumes that you're familar with the basics of editing in blender already. It's just a reference for a lot of hotkeys with images to refresh myself quickly on how to do things. More is added as I figure out how things work.
Where can I get started?
Shortcuts
Shortcuts (With Detail) (Personal Useful Order)
One thing I dislike is lists of blender shortcuts without examples. The Manual has a lot of detail, but it's hard to pick out what is directly useful when editing. Listed below are shortcuts I keep going back to after finding.
Search Commands
Shortcut: F3 - Search Commands
This will bring up a search box to search all available actions. It's the best way to find something as long as you have some idea of what it will be named.
Vertex, Edge, Face
Shortcut: 1, 2, 3 - Vertex, Edge, Face
When you're modeling you're going to jump between these modes quite a bit. Memorizing these three hotkeys are going to make modeling much faster.

Shortcut: G, S, R - Grab, Scale and Rotate
- Allows you to Grab your selection to move it.
- Allows you to Scale your selection to change its size.
- Allows you to Rotate your selection to rotate it to a new direction.
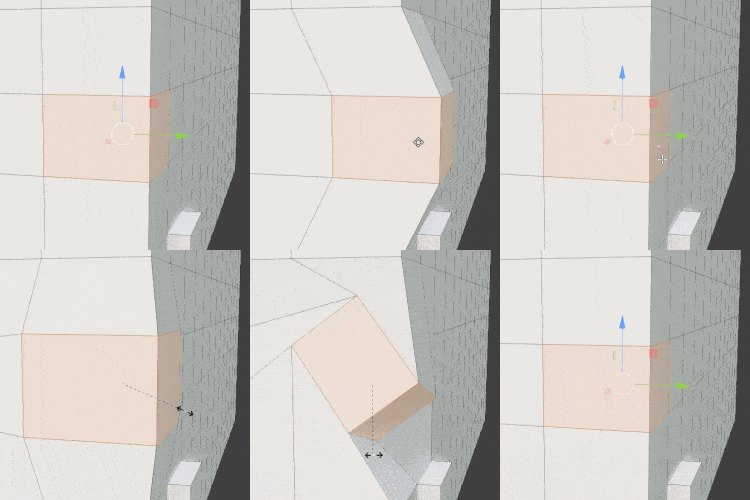
Advanced Shortcut: X, Y or Z while Active
This will allow you to lock your movement to an axis when using the tool. If you press Shift-X, Y or Z you'll lock it to the other two axis. This is great if you need to move something without it getting out of place.
Tip: If you press X/Y/Z again it will switch from local to global for your action.
Shortcut: Ctrl-E, Ctrl-F, Ctrl-V -Edge, Face, Vertex Menus
This will bring up modifier menus for edge/face/vertex, useful to see options all at once.
Extrude, Inset
Shortcut: E - Extrude
Extrude allows you to take a selection and make it come out. Useful for buildings or horrible organic shapes.
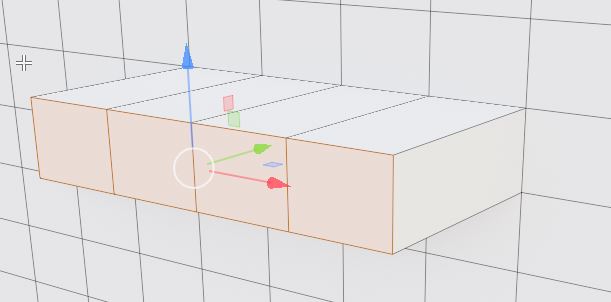
Note: If you're not careful you can leave duplicate geometry when extruding. You can use L to select the mesh you are working on, then press M and choose Merge by Distance to clean it up.
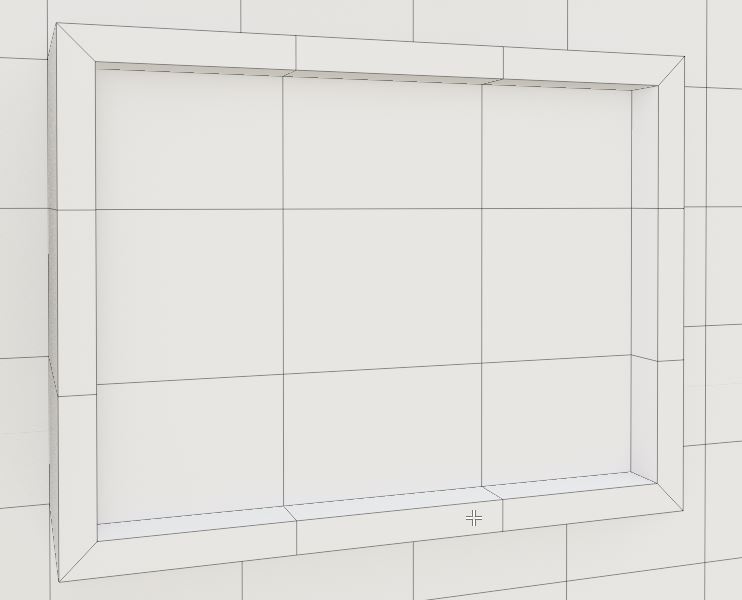
Shortcut: I - Inset
Extrude's introverted sibling, allows you to take something and create an internal part the same shape. You can then use it to Extrude inwards or outwards to make interesting cuts.
Advanced Shortcut: Alt-E - Extended Extrude Options

Extrude along individual faces appears to be the most handy, but the others might help depending on what you're modeling. I've got this here mostly to remember that Alt-E exists for me to use individual faces.

Note: Like Alt-Scale below, you can hold Alt after the command for even thickness while extruding.
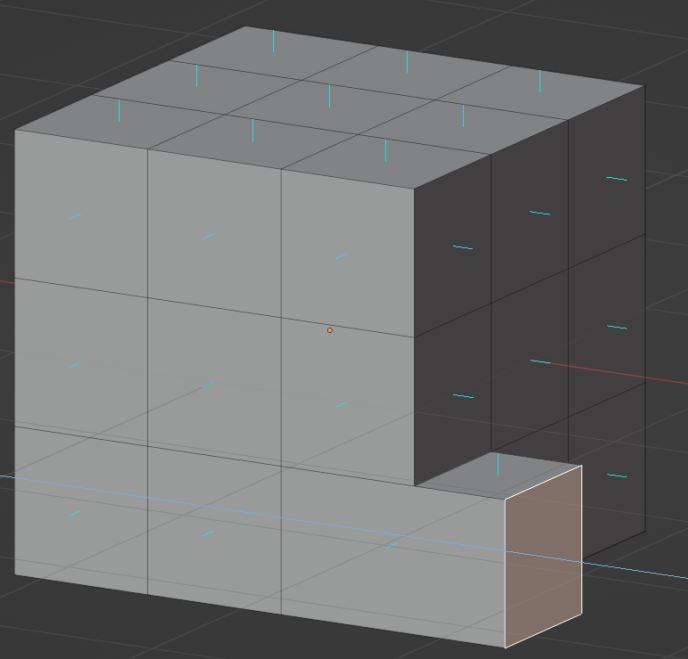
Note: Extrude Manifold - Extrude Manifold allows you to extrude while not keeping geometry at an edge. Screenshot Credit goes to TooMuchAbstraction.
Advanced Shortcut: I - Inset Toggle
You can toggle inset (by pressing I again) to do your whole selection or individual faces. This is amazing for cool science fiction buildings or just boring stuff like gears and houses.
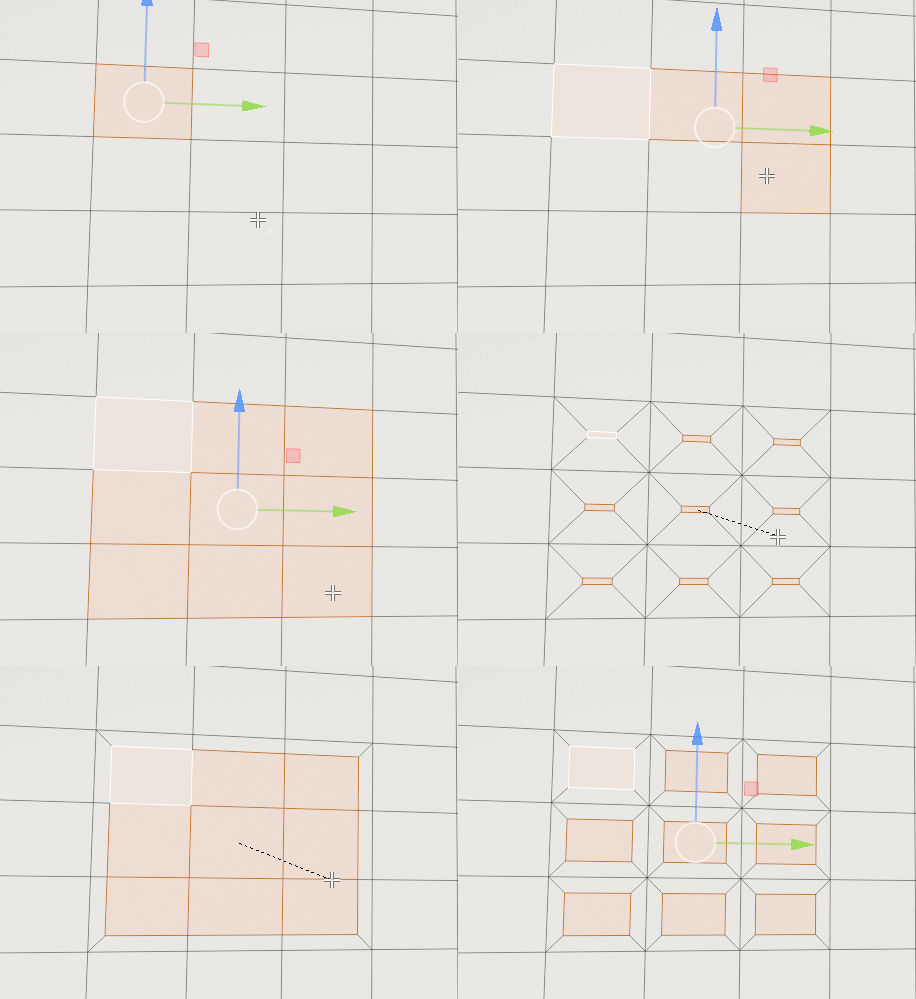
Note: Inset will remember what mode you left it in. Keep this in mind as you model.
When working in Inset and Extrude, use B to enable the boundry mode for calculations.
Shrink and Grow
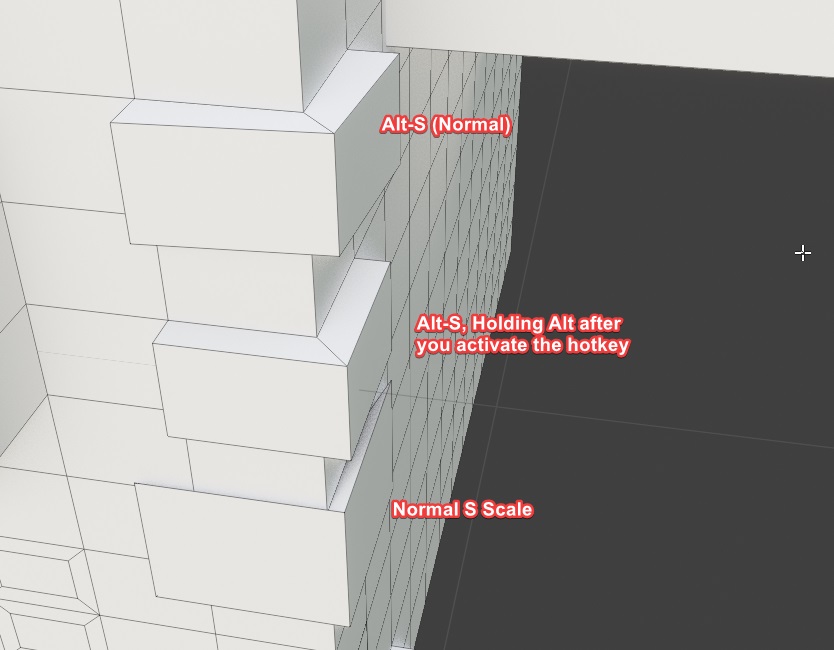
Advanced Shortcut: Alt-S - Shrink and Grow (Hold Alt after to make it even scaling)
Look, often when you want to scale out a hard shape you want it to scale following the faces that are selected. This hotkey does it. Finding this out was 50% of the reason I wanted to write this out so I did not forget about it. The other 50% was the L hotkey.
Slide Along Mesh
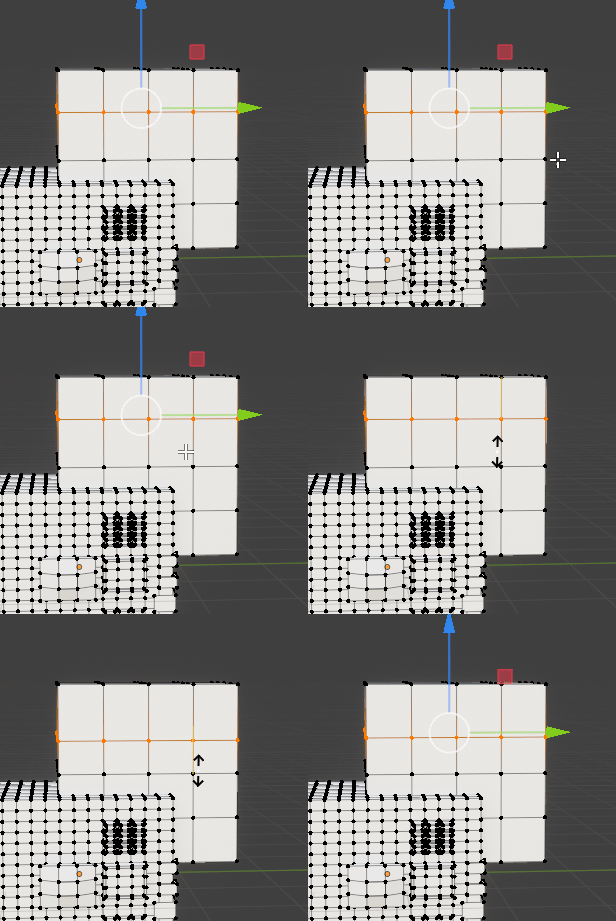
Advanced Shortcut: G and G - Toggle Slide Along Mesh
This will allow you to slide your selection along the mesh. Great for moving lines around.
Snap Along Mesh
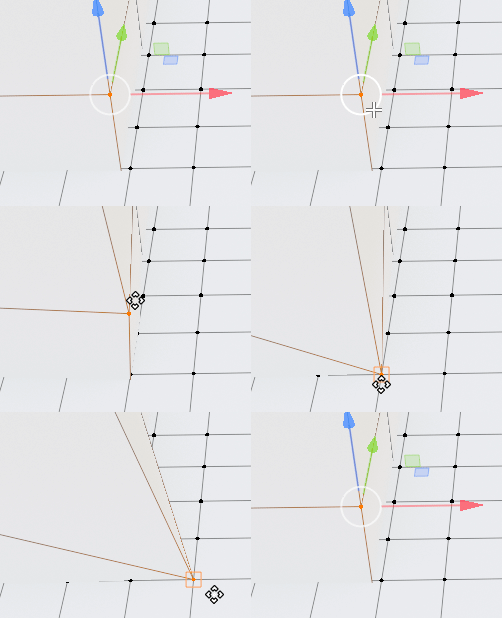
Advanced Shortcut: G then Holding Control After
When you hold control after you press G, you enable snapping mode. This is handy if you lock a direction with X/Y/Z since it will allow you to align something perfectly. You can adjust snapping in the menu by the magnet icon in the top bar.
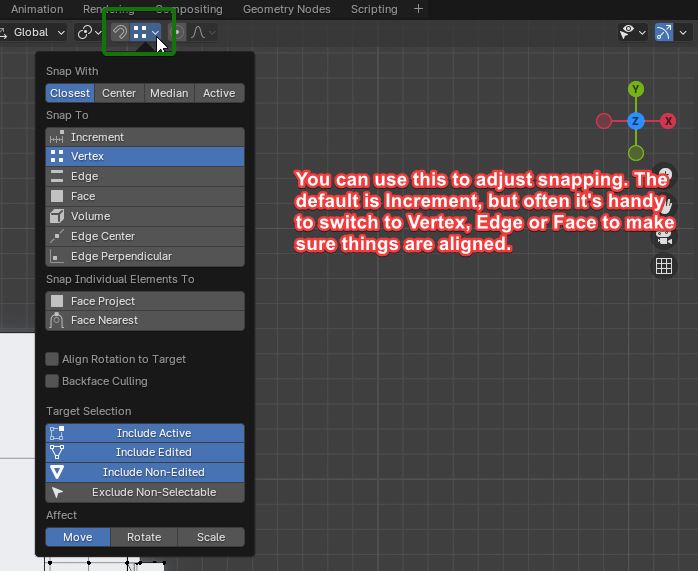
It looks like this in action.
Sheer
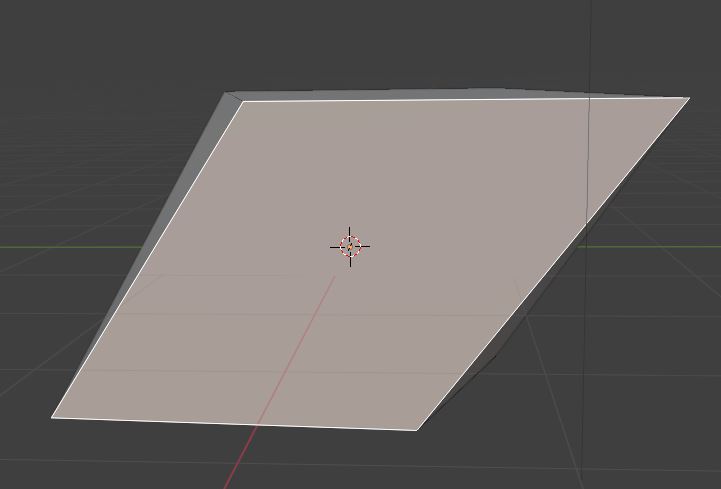
Shortcut: Ctrl-Alt-Shift-S - Sheer
Shear a selection.
All About Bevel
Shortcut: Ctrl-B - Bevel
Bevel is a good way to made an edge smoother, you can use the mousewheel to add more beveled edge lines.
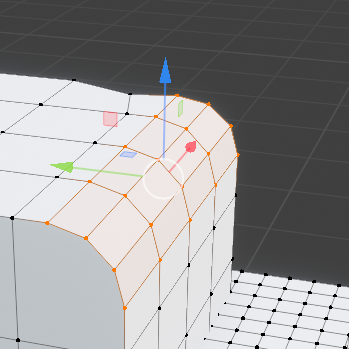
Advanced Shortcut: Ctrl-B then C while Active
This will constrain your Bevel action so it can not go outside of the geometry near it.
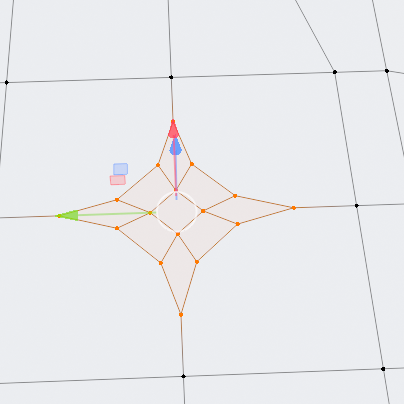
Advanced Shortcut: Ctrl-B then V while Active
This will allow your Bevel action to impact Vertices
Delete and Dissolve
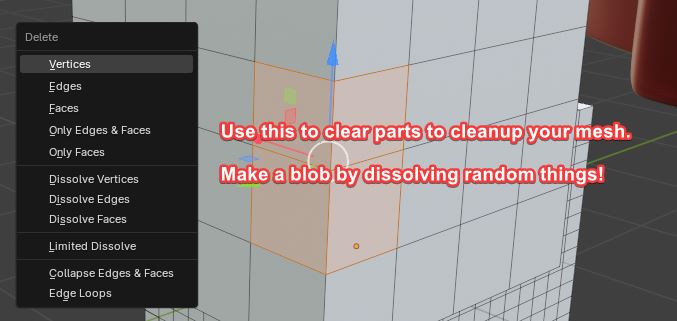
Shortcut: X - Delete and Dissolve
Instead of using "Delete" consider using X when you need more control over how you remove parts of your mesh.
Fill
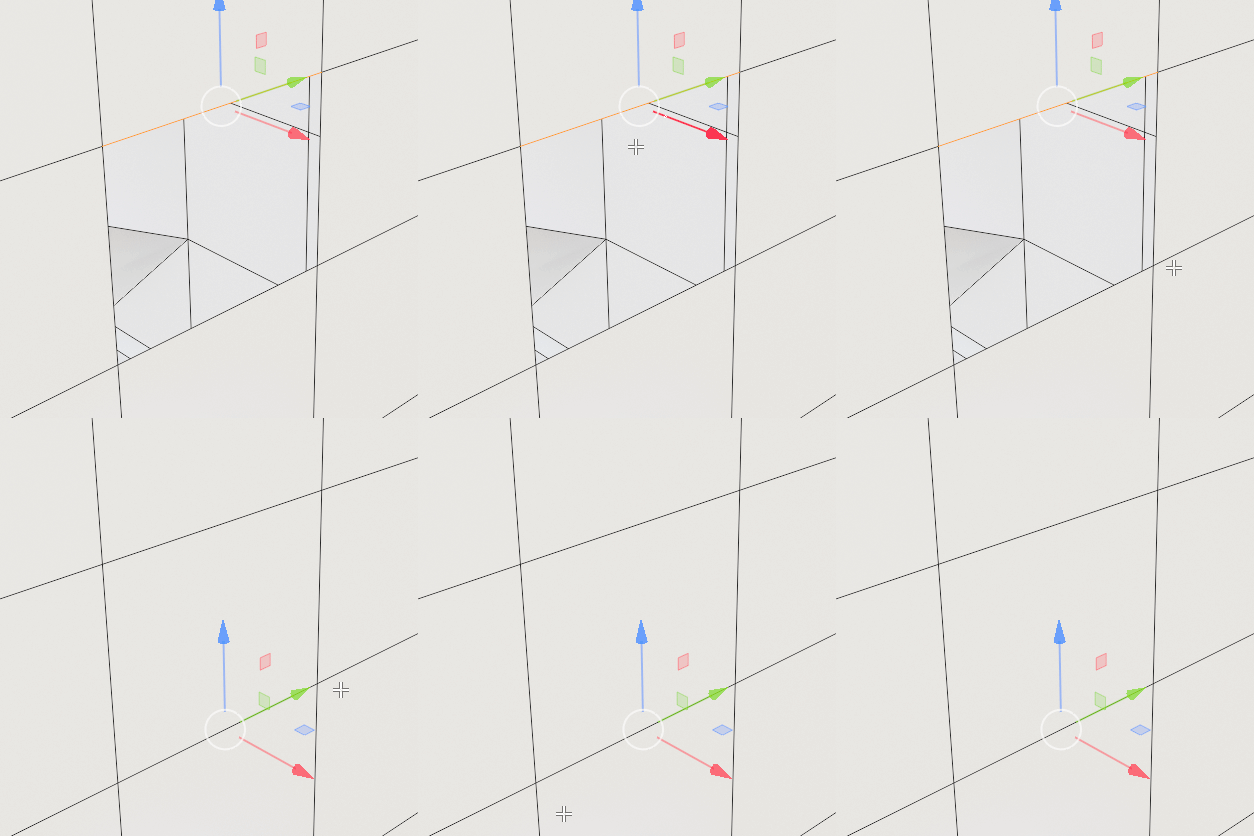
Shortcut: F - Fill
Fill in a hole in a mesh. Different selections around the hole provide different results.
Duplicate
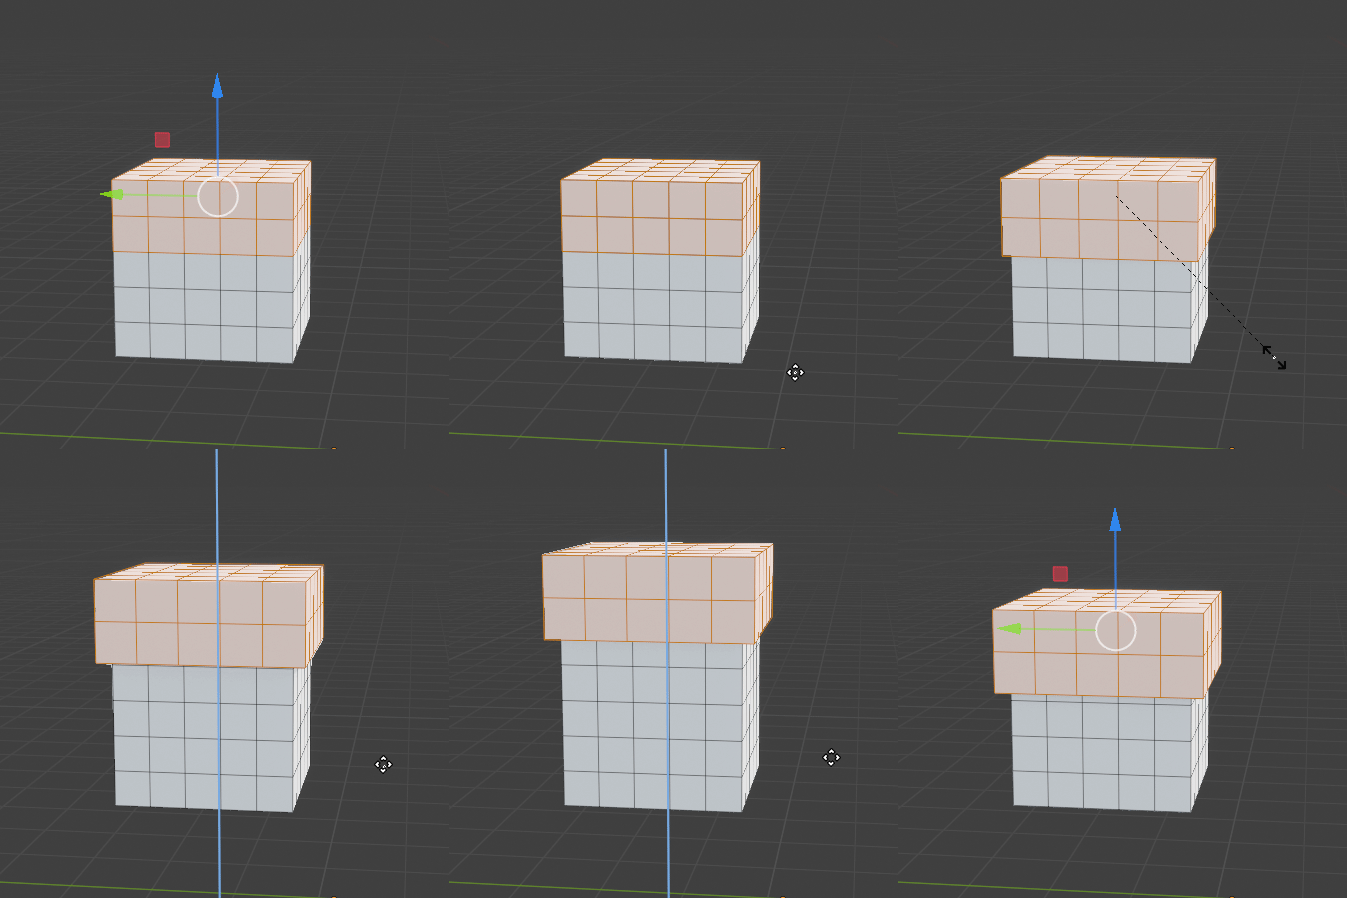
Shortcut: Shift-D - Duplicate
Duplicate your selection, this can allow you to duplicate part of a mesh or a whole selected mesh. Great for if you need to take a selection to make something that would fit over it.
Split
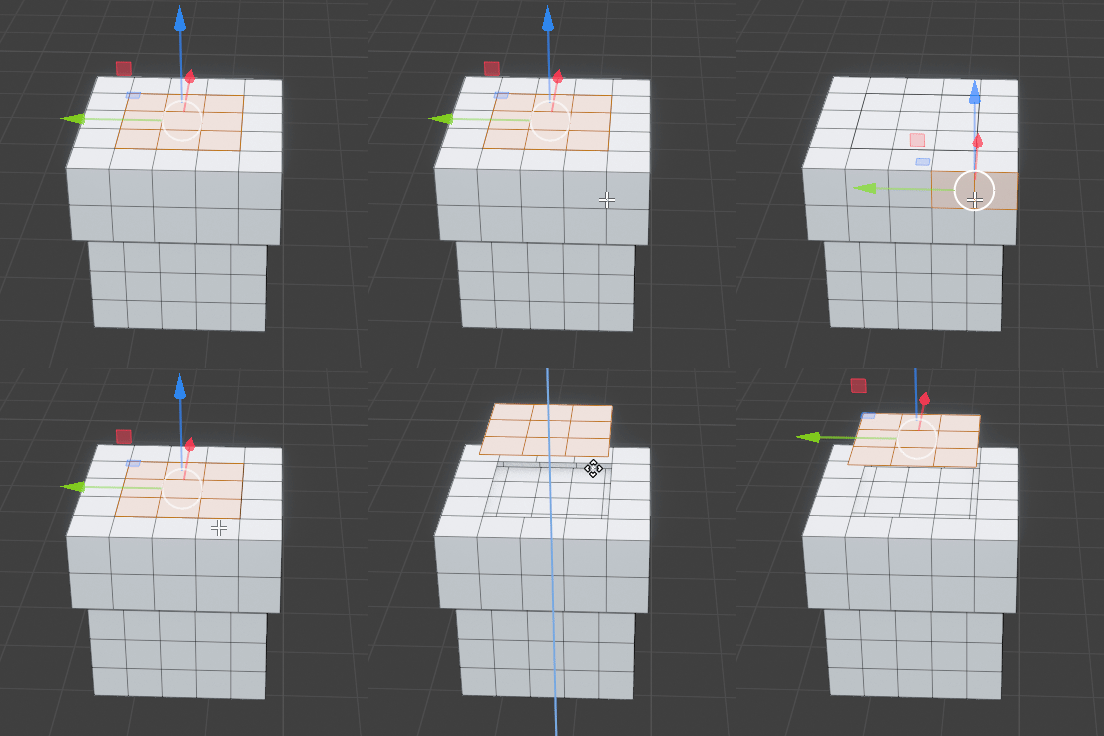
Shortcut: Y - Split
Split the selection from the mesh.
X-Ray and Z
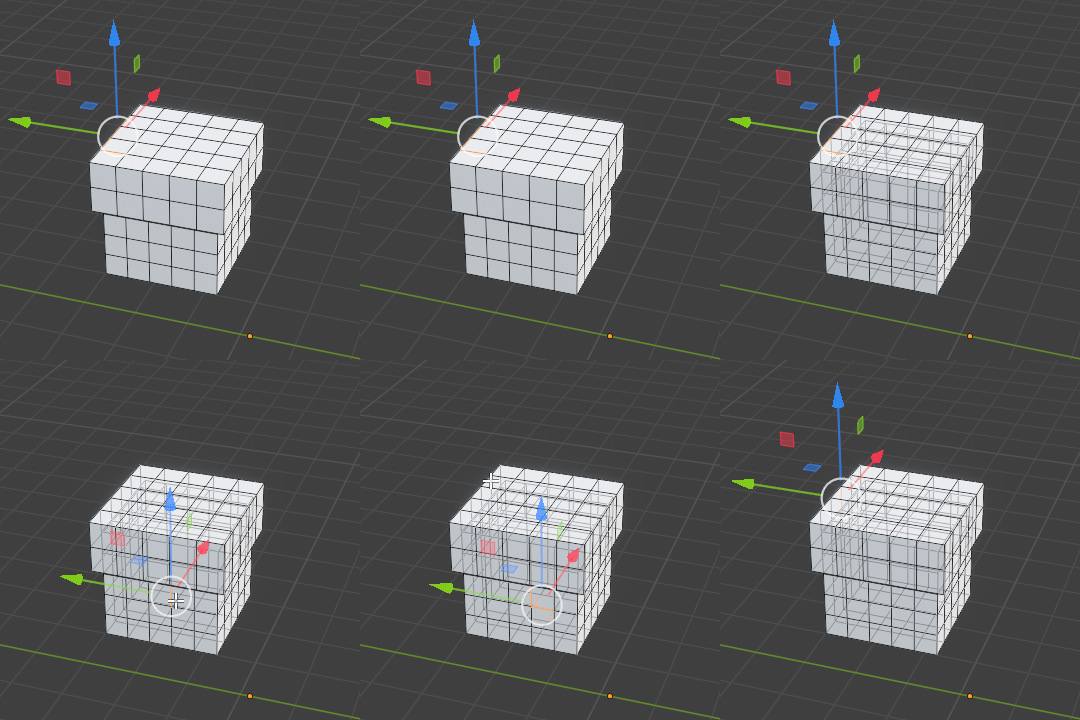
Shortcut: Z - Toggle Material View and Alt-Z - Toggle X-Ray
Allows you to select vertex/edge/faces behind what's visible.
Knife
Shortcut: K - Knife
Cut directly into a model and draw directly.
Shortcut: Shift-K - Knife (Only Selected)
Cut directly into a model and draw directly on selected faces.
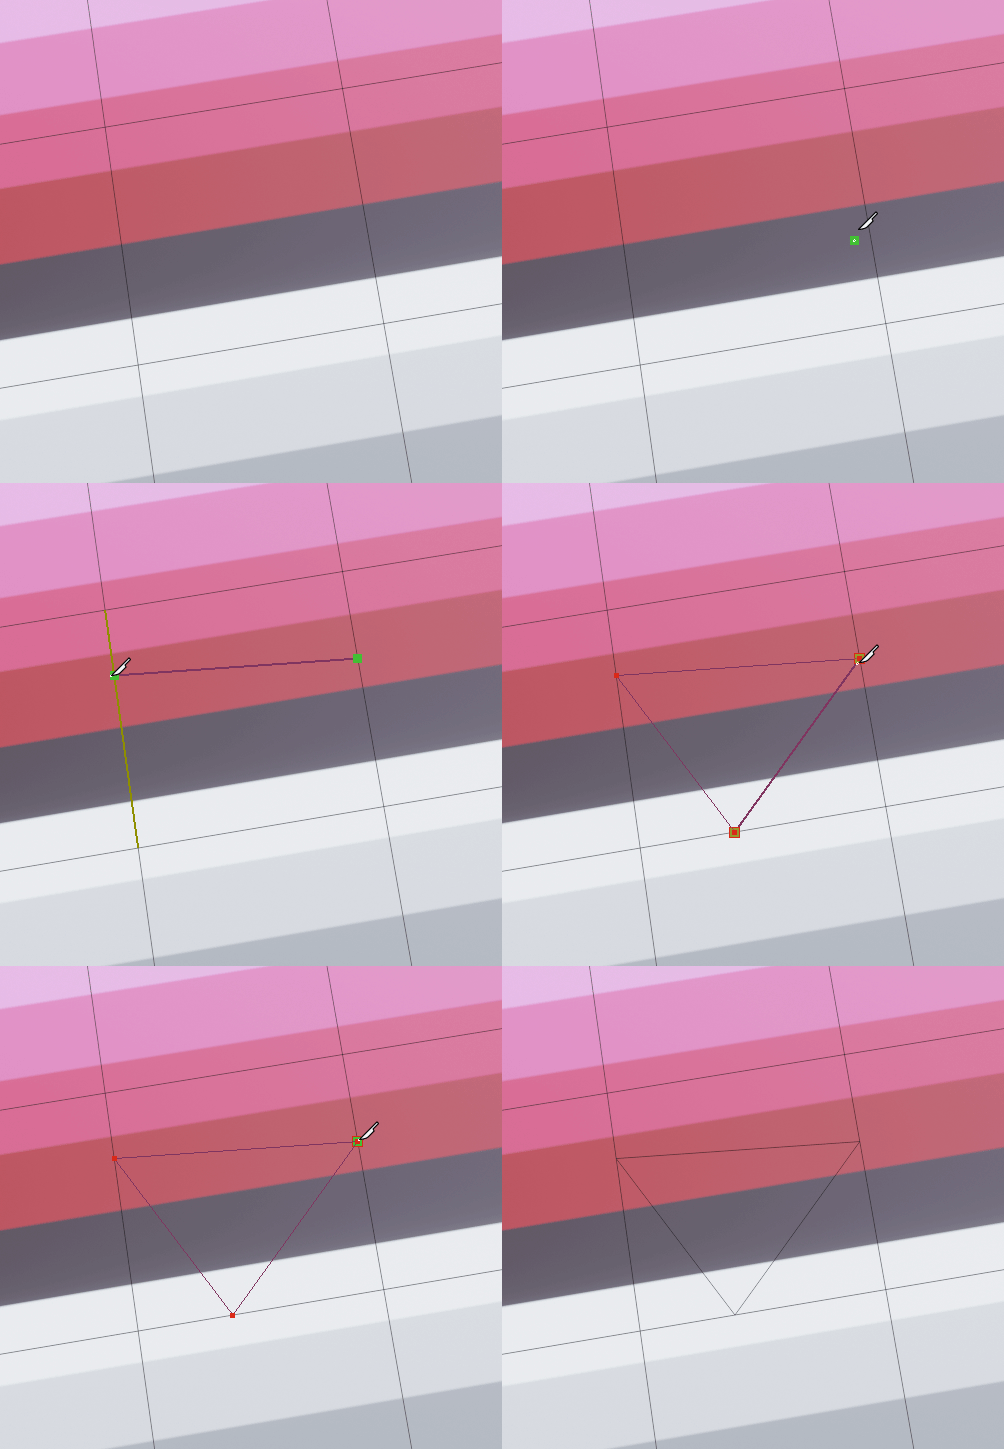
Advanced Shortcut: A while Active - Constrain Angle
Cut only along certain predefined angles
Advanced Shortcut: Enter while Active - Confirm Cut
Use this to apply your cut when done.
Advanced Shortcut: Esc while Active - Cancel Cut
If only Lady Scottish Play could have done this. (Cancels the cut you were making)
Advanced Shortcut: Shift while Active - Cut in Middle
Makes your cuts aim towards the midpoint of an edge.
Advanced Shortcut: C while Active - Cut through the Mesh
Saw that model in half! Let's go!
Advanced Shortcut: V while Active - X-Ray Mode
Allows you to see though the mesh when cutting.
Loop Cut
Shortcut: Ctrl-R - Loop Cut
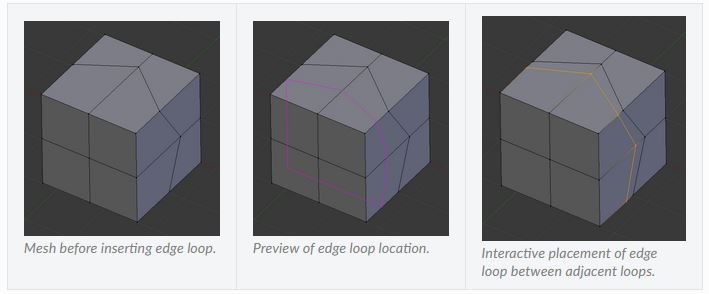
Cut a loop into a mesh, spin the mouse wheel to change the number of cuts. You can also move the cuts around on the mesh. Image below from the Blender Manual.
Object Focus and Hiding Other Objects
Shortcut: / - Hide Other Objects
This will let you focus on editing one object at a time and hide all other objects.
Recover Closed Modifier Menu
Shortcut: F9 - Recover Last Operator Menu
This will recover the last operator menu that was open before you closed it. Good for recovering when you click off by mistake after doing one of the above shortcuts.
Quad View
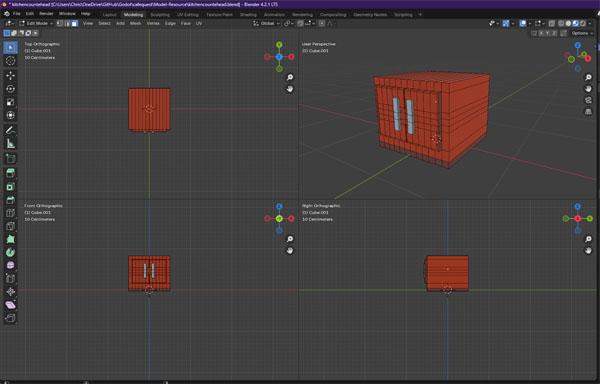
Shortcut: CTRL-ALT-Q - Quad View
This will give you Quad View when 3D Modeling, giving you a view of the model from the front, side, top and a 3D view.
Selection Methods
Selection Methods
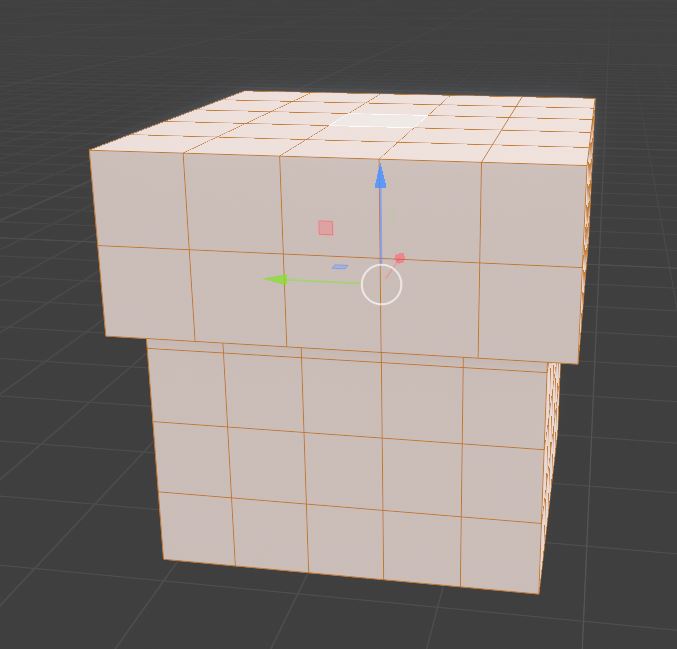
Select All - Shortcut: A
Selects everything.
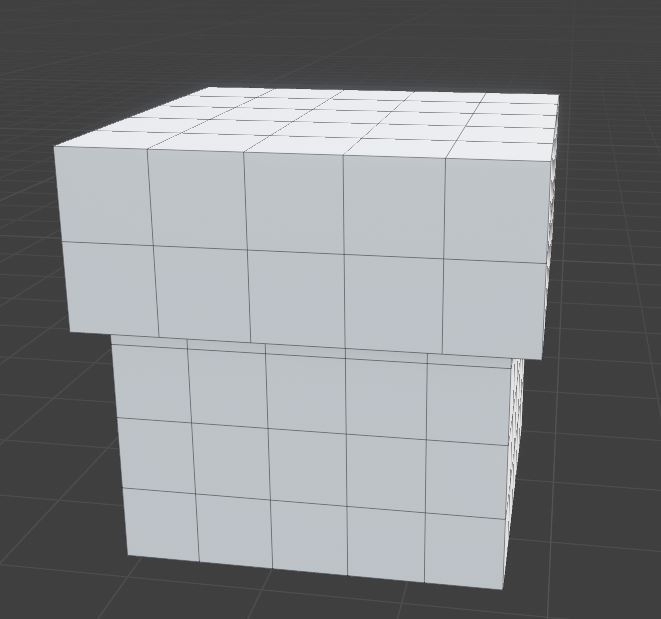
Select None - Shortcut: Alt-A OR Tap A twice fast
Unselects everything.
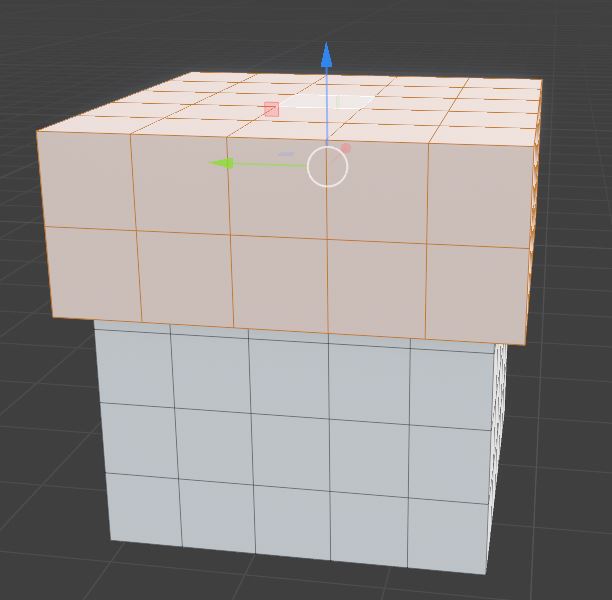
Select Linked - Shortcut: L
Look, I wanted to mention it again. It's really good for selecting a mesh without selecting any unrelated meshes.
Unselect Linked - Shortcut: Shift-L
Unselect the mesh.

Box Select - Shortcut: B
Selects everything in a box you draw on screen.
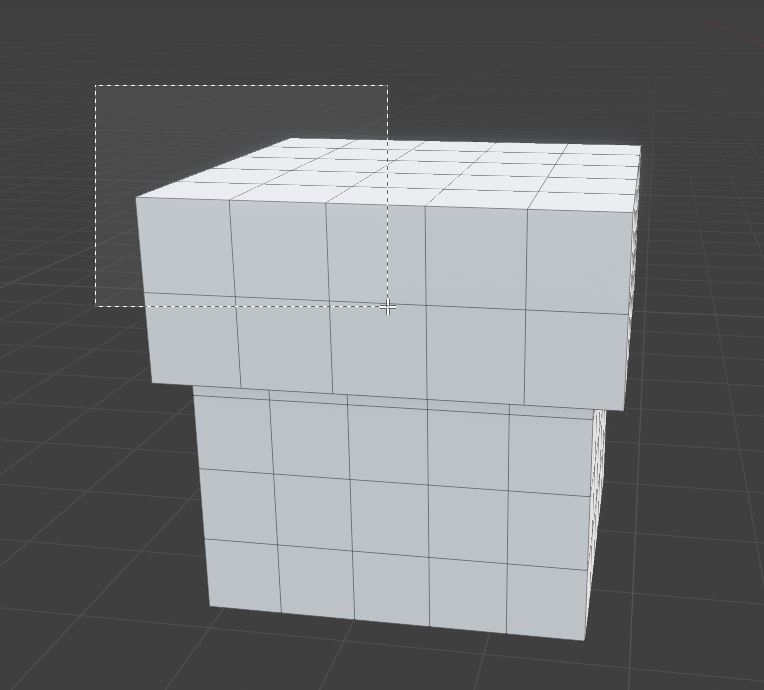
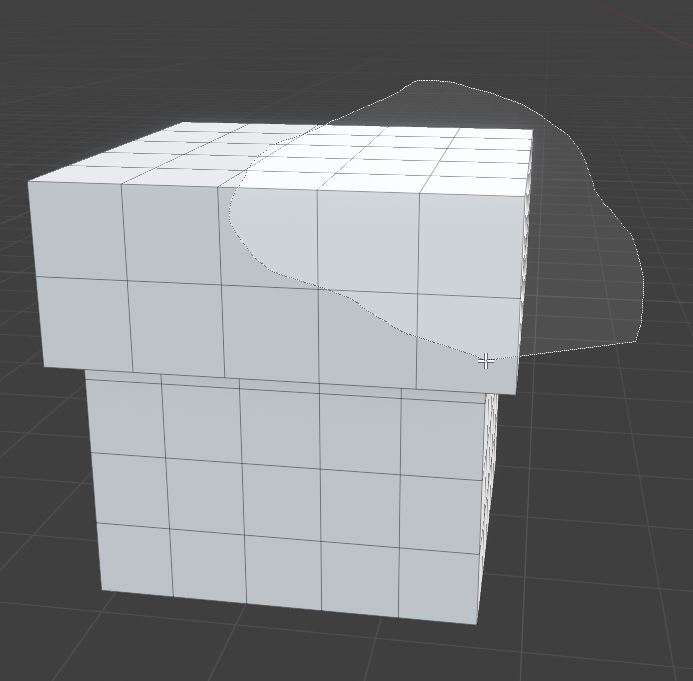
Lasso Select - Shortcut: Ctrl-RightMouseButton
Draw a shape and select everything inside. Useful for selecting a bunch of small things.
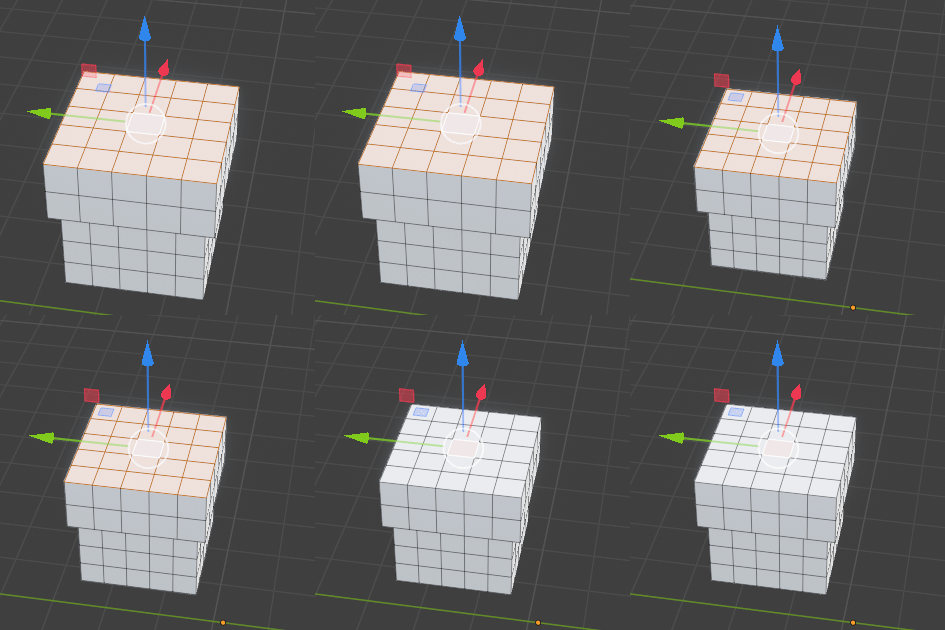
Select More - Shortcut: Ctrl-Numpad+
Expands your selection, useful for selecting the top of the object and growing it.
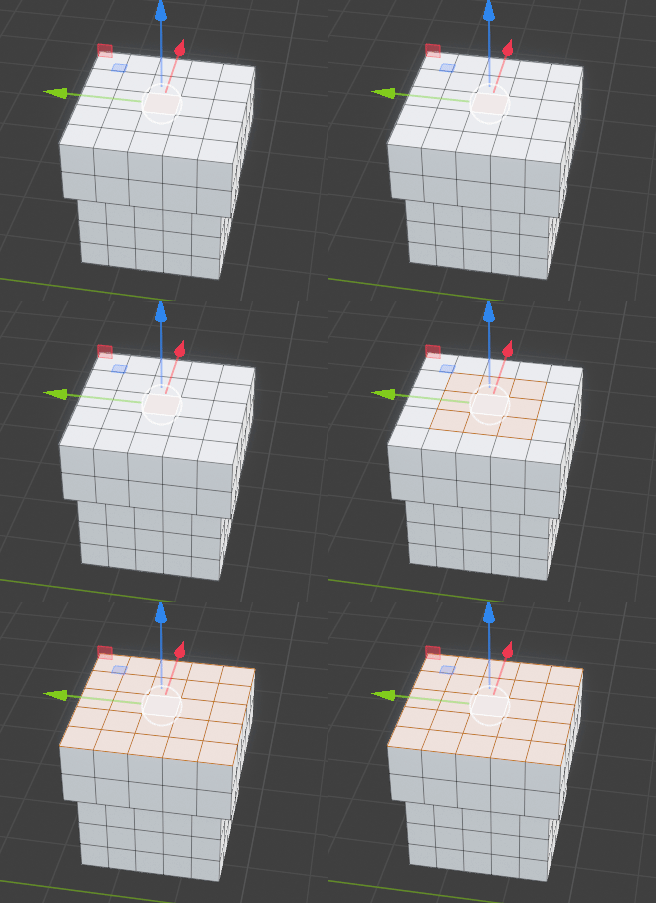
Select Less - Shortcut: Ctrl-Numpad-
Selects less, used to reduce your last Select More.
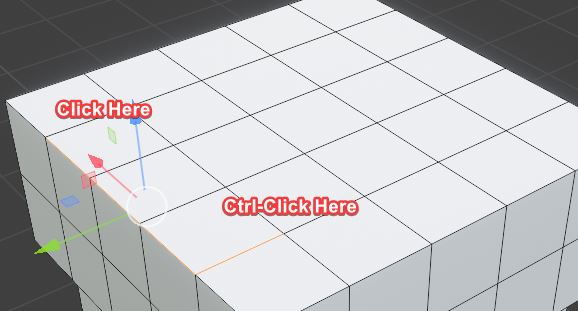
Select Shortest Path- Shortcut: Ctrl-LeftMouseButton
Selects all elements along the shortest path between what you have selected last and what you just Ctrl-LeftMouseButton clicked. If you hold shift it will find all the shortest paths. Sometimes turns off for no reason.
Select Edge Loop/Edge Ring - Shortcut: Alt-LeftMouseButton
This will try to select around the object, depending on the mode you are in.
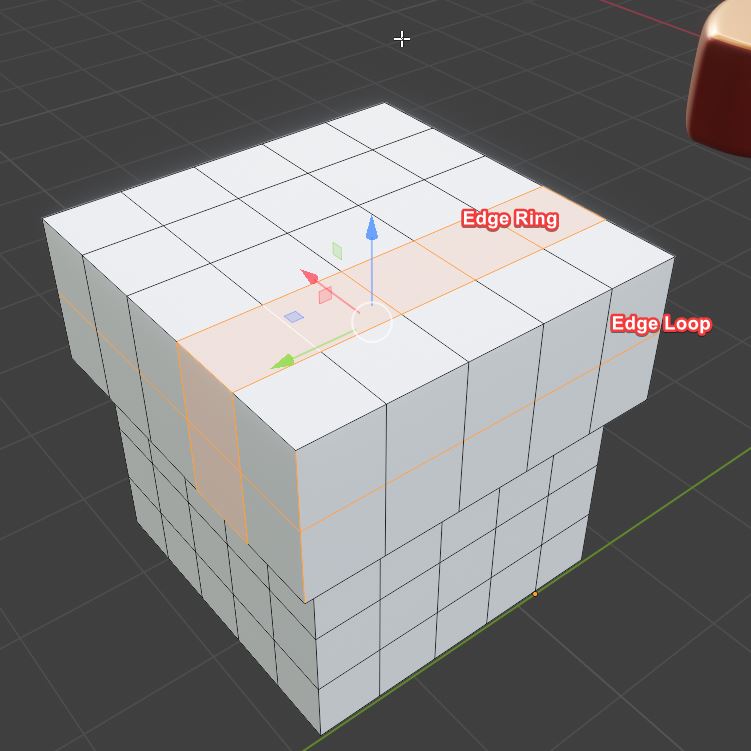
Select Invert - Shortcut: Ctrl-I
Selects the invert of the faces you have currently selected.

Proportional Editing
Proportional Editing - Shortcut: O
This section has information from Proportional Editing on the Blender 4.0 Manual.
This is a way to make a mesh behave like clay. You can move it around and the other parts of the mesh will move with it.
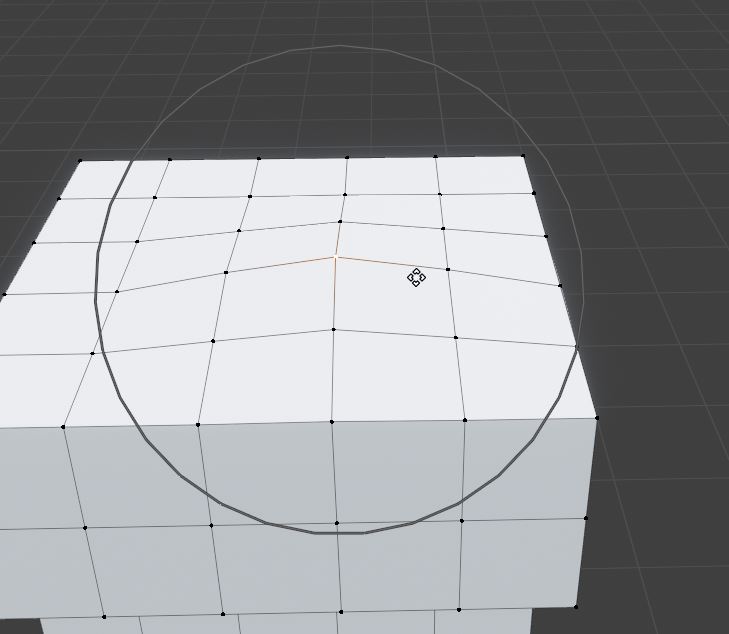
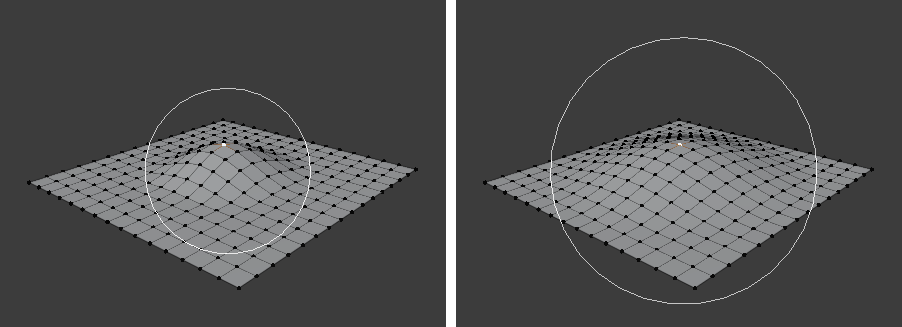
Advanced Shortcut: Mousewheel, PageUp/PageDown (While Grab/Scale/Rotate)
Adjust the size of the area impacted by your proportional edits.
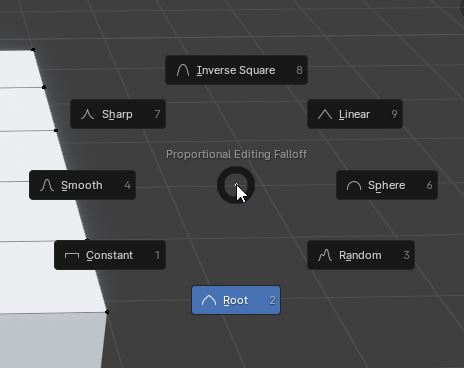
Advanced Shortcut: Shift-O - Falloff Choice
While editing, this will toggle between all the different ways you can move proportionaly.
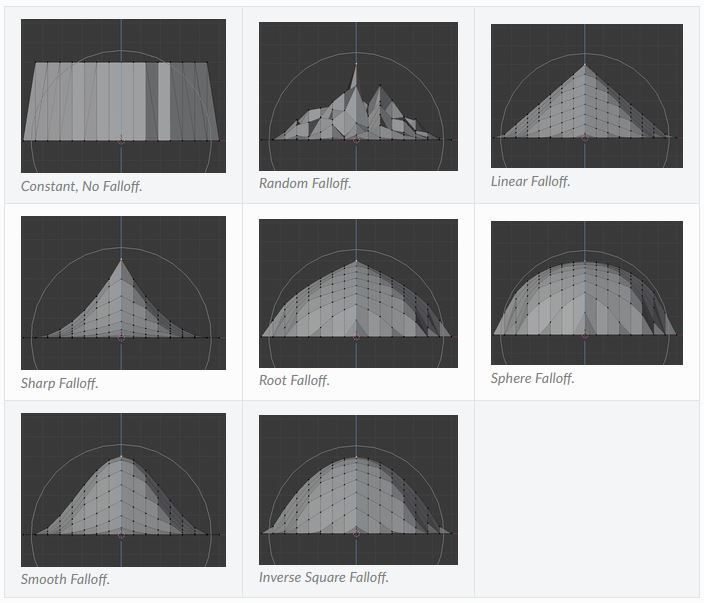
While not editing, this will show a choice menu.
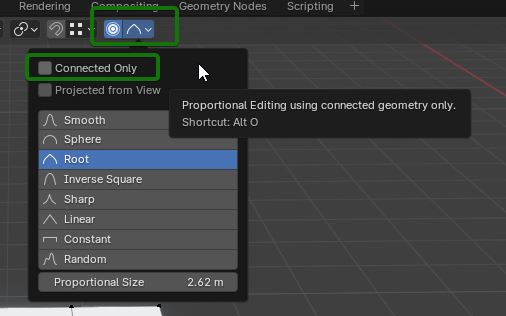
Advanced Shortcut: Alt-O - Connected Only / All
This will allow you to only move around parts that are connected to the current mesh. Great for edits where you do not want to impact anything else.
Note: This hotkey does not work while you're activly updating the mesh. Only when there is no gizmo visible. You can also change it from the menu.
Pivot Points
Pivot - Shortcut . (Object Mode)
This section has information from Pivot Point and Transform Selections on the Blender 4.0 Manual.
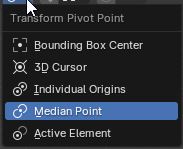
The Pivot Points are the point around your rotation and scales happen.
3D Cursor
Scale/Rotate from the 3D Cursor.
Bounding Box Center
Scale/Rotate from the center of the selection.
Median Point
Scale/Rotate along the center point average of each selection.
Individual Origins
Scale/Rotate along each selection individually.
Active Element
Scale/Rotate from the current active object.
Transform Orientation
Transform Orientation - Shortcut: , (Object Mode)
This section has information from Pivot Point and Transform Selections on the Blender 4.0 Manual. (This is very dry and hard to reword, so it has been left mostly as is this time.)
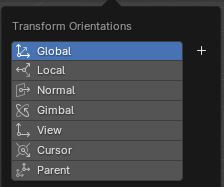
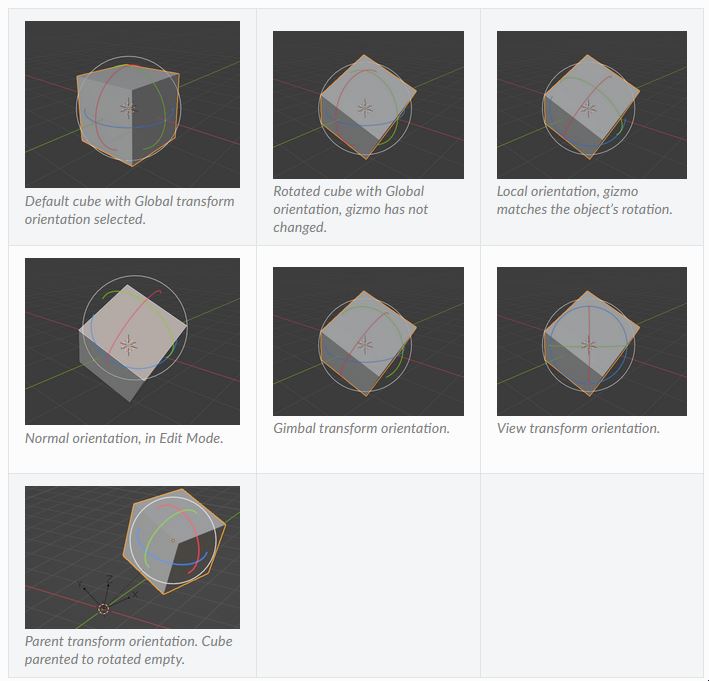
The Transform Orientation determines the orientation of how you can scale, rotate or move the object. Changing this orientation can make it easier to perform transformations in the direction you want.
Global
Align the transformation axes to world space. The world axes are shown by the Navigation Gizmo in the top right corner of the viewport, as well as the Grid Floor.
Local
Align the transformation axes to the active object’s orientation.
Normal
In Edit Mode, orient the transformation axes so that the Z axis of the gizmo matches the average Normal of the selected elements.
In Object Mode, this is equivalent to Local orientation.
Gimbal
Orient the transformation axes to visualize the workings of the object’s Rotation Mode. This is specifically useful for the Euler modes, where the object is rotated one axis at a time: the rotation axes don’t stay perpendicular to each other and might even overlap, a phenomenon known as gimbal lock that complicates animation.
View
Align the transformation axes to the view (meaning they change as you orbit around):
- X: Left/Right
- Y: Up/Down
- Z: Towards/Away from the screen
Cursor
Align the transformation axes to the 3D Cursor.
Parent
Align the transformation axes to the Parent.
Custom
You can define a custom orientation to focus on transformations based on the direction of a face. This is useful if you've made a monster mesh and you just need to fix that one thing.
- You can read more here: Blender Manual.
- Watch a short video: CUSTOM ORIENTATION in Blender - quick tip (Time: 57s)
Mesh Modeling General
. - While Mesh is Selected
This will allow you to focus on a part of the mesh and rotate around it. Useful for fine details.
Shift-R - Repeat Last Action
This will repeat the last action that you did, useful for quick modeling operations.
Selecting Hidden Objects
If you have an object behind another object, you can Alt-Left Click and select the objects from a menu.
Quick Favorites Menu
You can right click anything to add it to the quick access menu and press q to open all the things you have added.
Search the Outliner with Period
Select your object, move your mouse over the outliner and press . to find it.
Clean Up
You can clean up all unused resources from the menu under File, Purge.
Mesh Normals
Mesh Normals
Does your mesh have holes in it when you export it to a game engine or into a mod you're making?
- Select the whole Mesh in edit mode.
- Press Alt-N
- Choose Recalculate Outside
Spherize
Clt-Shift-S - Spherize
This will try and round your selection into a sphere shape. Useful for organic modeling.
Blender Modifiers
Blender Modifiers
- These are useful for quick modeling, you can read about them with the Blender Manual. (Honestly, this is a great text resource with examples)
- You can watch a video of all of them here.
- Detailed Video Tutorials Here
Moving Origin
Move Object Origin with Ctrl-Period
You can use CTRL-Period to move an object's origin, in case you need to moved to apply an operator or to position it in a spot for a game engine.
All About Rigging
Rigging Tips
I'm not going to go into detail on how to rig, consider these resources: Humane Rigging or Low Poly Character Modeling or Cartoon Character Rigging.
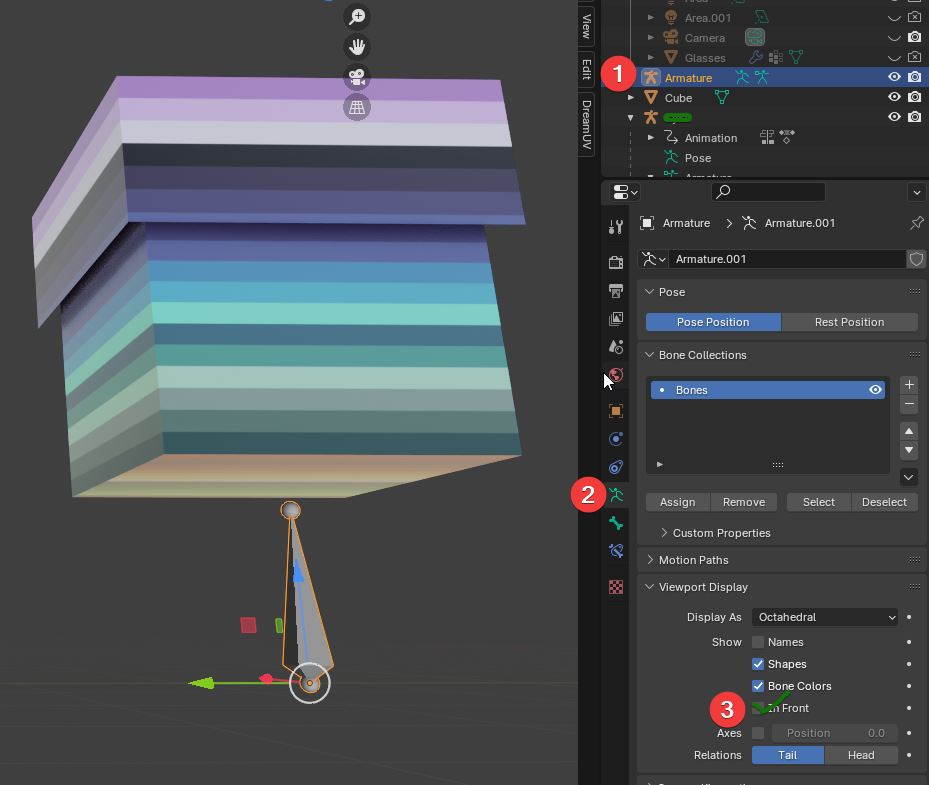
Show Bones Over Mesh
- Select Armature
- Choose Data
- Viewport Display Submenu
- Select In Front
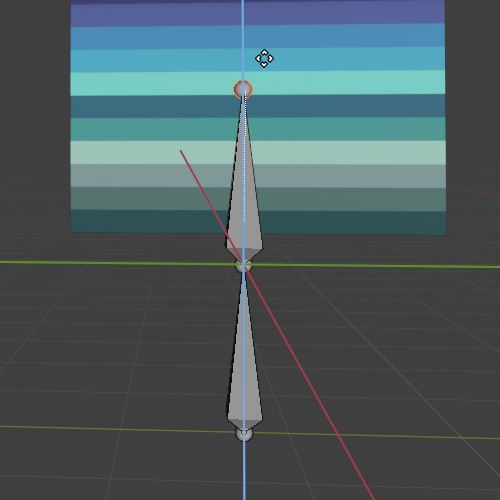
Extrude New Bone
Tip: Use Snap to Volume to easily align bones to the mesh.
- Select Armature
- Go to Edit Mode
- Select the side of the bone to extrude from
- E to extrude
- You can use the middle mouse button to lock it to an axis
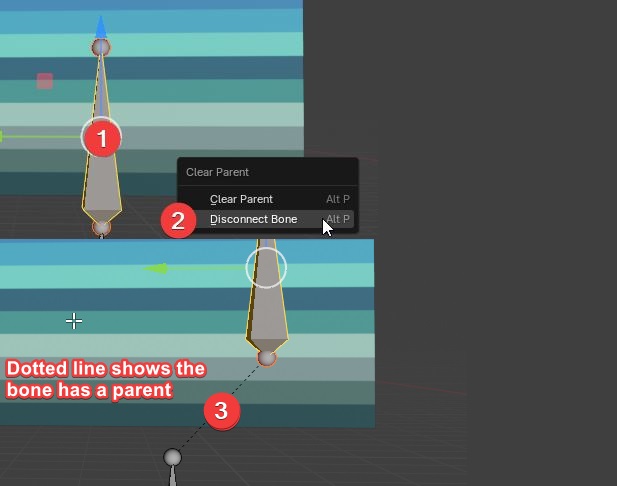
Separate Extruded Bone
- Select the bone in the center
- Alt-P Disconnect Bone
- Move the Bone to the New Location
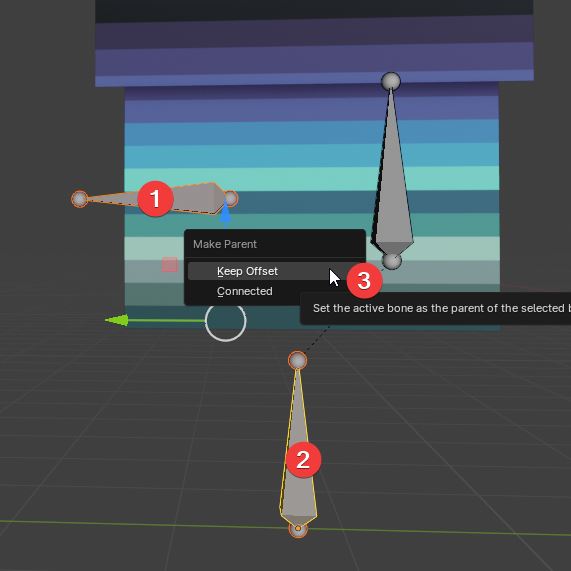
Parent a Seperated Bone
- Select The seperated bone
- Shift-Select the parent bone
- Ctrl-P - Parent Menu
- Choose to move the bone back, or keep it at the current location
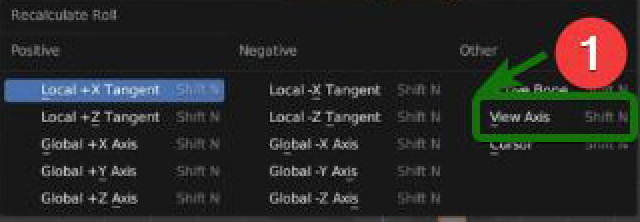
Align Bones (See Video - Imphenzia)
- Align the model to face Y, most game engines appear to prefer it.
- Select All Bones
- Use Ctrl-NumPad1 and you should see the front of your character
- Ctrl-N and select View Axis
Symmetrize Bones
- Make sure you Align Bones (Above) first
- Make sure your bones are named in the format [NameYouCareAbout].L or .R, for the bones to mirror
- F3
- Seach: Symmetrize, Select Armature > Symmetrize
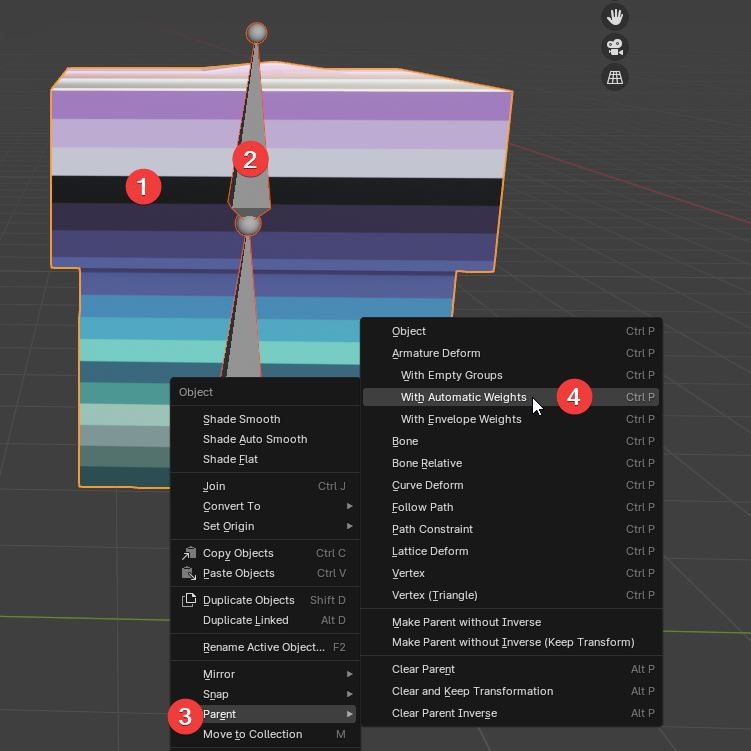
Parent Armature to Mesh (Options)
- Object Mode
- Select the Armature
- Shift-Select the Mesh
- Right Click
- Parent
- Choose From Selection
Weight Painting and Agony
h2>Weight Painting Tips
I'm not going to go into detail on how to weight paint, consider these resources: Humane Rigging or Low Poly Character Modeling.
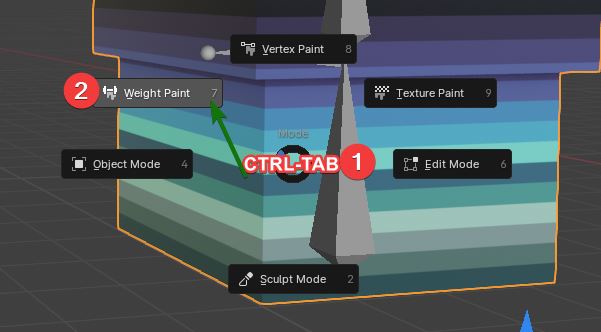
Access Weight Paint
- Select the Object (Not the Armature)
- Ctrl-Tab - Weight Paint
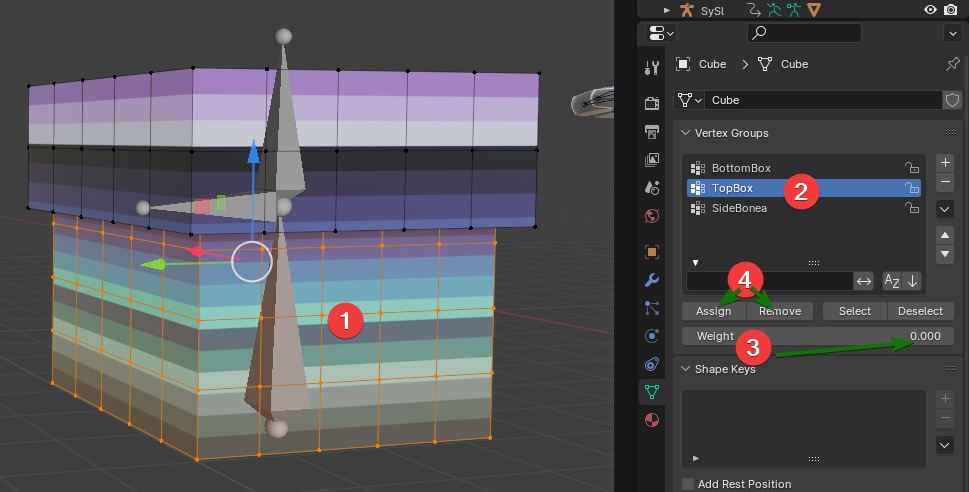
Assign Weights to Selection
- Select the Object (Not the Armature)
- Ctrl-Tab - Edit Mode
- Select the area you want to apply the Bone Weight
- Select the Vertex Tab
- Select the Bone
- Set the Weight between 0.0f and 1.0f
- Click Assign
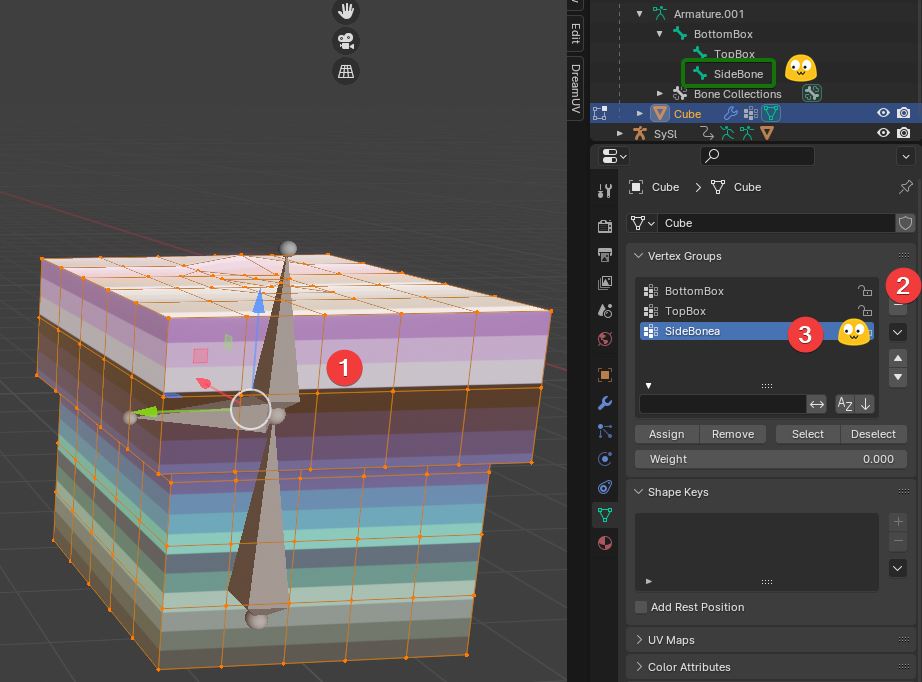
Add Back Missing Bone [Or add bone after weighting is done]
- Select the Object (Not the Armature)
- Ctrl-Tab - Edit Mode
- Select the whole mesh
- Select the Vertex Tab
- Click the [+] button under Vertex Groups
- Type the Name of the Bone
Notes About Weight Paint
So if you come from other 3D programs, you may have some idea on how weight painting works. Throw those away.
- Each bone can 0-100% apply weight to the mesh, adding more of Bone1 does not reduce Bone2-99
- You can enable Auto Normalize and Blender will do this, it's under the PAINT OPTIONS
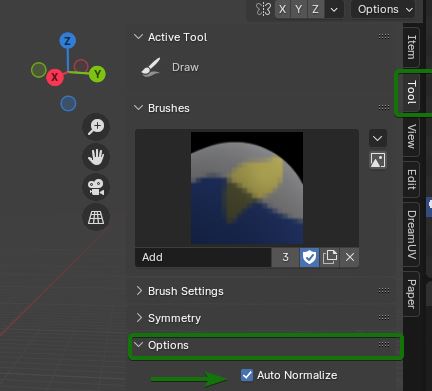
- You can enable Auto Normalize and Blender will do this, it's under the PAINT OPTIONS
- Select the bones at the top menu in weight painting mode
- Try your best to set up autoweights and only do cleanup unless you're hard parenting parts of a mesh to a bone.
- Symmetry will let you paint both sides of an object faster, enable X/Y/Z or Mirror
- Brush Settings -> Advanced -> You can toggle on and off front faces only.
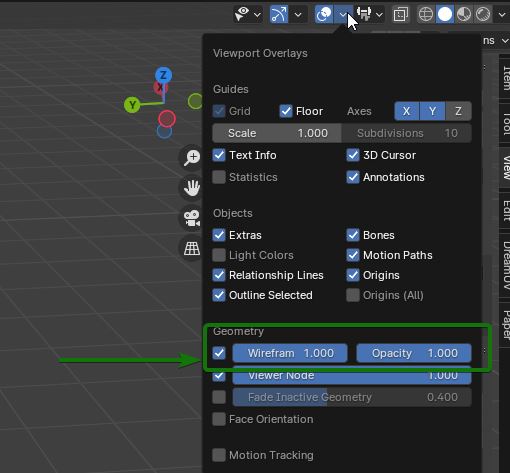
- You can show the wireframe while weight painting to make targeting the vertex points easier.
Lazy IK Details
IK Tips
I'm not going to go into detail on how to rig, consider these resources: Humane Rigging or Low Poly Character Modeling.
- Watch this section for the basics: LEARN LOW POLY Character Modeling (Time: 54:02) It's a lot to write out.
- IK Solver - Blender Manual
- Blender 4.0 New Features
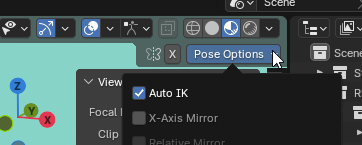
Auto-IK
Want to animate something but don't want to set up IKs? Just use Auto-IK in the upper right. It's not perfect but it can pass for quick and dirty posing.
Links
Reccomended Plugins
Built In
- Add Curve: Extra Objects
- Add Mesh: Extra Objects
- Auto Mirror
- Good to remirror a mesh.
- Edit Mesh Tools
- F2
- Loop Tools
- Node Wrangler (Shotcut: Node Mode - Ctrl-W)
- Bool Tool
- Tri-Lighting
- You will have to boost the power of the lights.
- Cell Fracture
- Export Paper Model
- Scatter Objects
Third Party
Third Party Reccomendations Made by Readers (Not Tested by Me)
- https://github.com/natecraddock/projectile
- https://github.com/NazzarenoGiannelli/matslotcleaner
- https://github.com/zeffii/TubeTool
- https://github.com/ranjian0/building_tools
- https://github.com/clarkx/Carver
- https://alexeymaslov.gumroad.com/l/pTRSb
- https://curtisholt.online/by-gen
- https://github.com/BenjaminSauder/EdgeFlow
- https://nd9h-production.gumroad.com/l/nd9h_abt
- https://github.com/Radivarig/UvSquares
- https://github.com/nutti/Magic-UV
- https://github.com/ionthedev/ReSprytile


